To fly Flix quadcopter, you need to upload the firmware to the ESP32 board, and set up the drone for flight.
You can either use the prebuilt binaries or build the firmware from sources — this will let you modify the firmware and add new features.
-
Download the latest firmware file using the following links:
Type Boards Link ESP32 DevKit, D1 Mini quadcopter.dev/flix.esp32.merged.binESP32-S3 Most S3 based quadcopter.dev/flix.esp32s3.merged.binESP32-S3 (2MB PSRAM) S3 Super Mini, S3 Zero (2MB PSRAM) quadcopter.dev/flix.esp32s3.qspi.merged.binESP32-S3 (8/16MB PSRAM) S3 Zero (8MB PSRAM) quadcopter.dev/flix.esp32s3.opi.merged.binESP32-C3 C3 Super Mini quadcopter.dev/flix.esp32c3.merged.binFlix2 Flix2 board quadcopter.dev/flix.flix2.merged.bin -
Flash your ESP32 board using ESP32 Web Flasher:

- Connect the board to your computer, press Connect to ESP, choose the serial port.
- Go to the Flash tab.
- Choose the downloaded firmware file, set Flash address to 0 (important).
- Click Program button and wait until the process is finished.

You can build and upload the firmware using either Arduino IDE (easier for beginners) or command line.
Get the sources using git:
git clone https://github.com/okalachev/flix.git && cd flixBeginners can download the sources as a ZIP archive.

- Install Arduino IDE (version 2 is recommended).
- Windows users might need to install USB to UART bridge driver from Silicon Labs.
- Install ESP32 core, version 3.3.10. See the official Espressif's instructions on installing ESP32 Core in Arduino IDE.
- Install the following libraries using Library Manager:
FlixPeriph, the latest version.MAVLink, version 2.0.33.
- Open the
flix/flix.inosketch from downloaded firmware sources in Arduino IDE. - Connect your ESP32 board to the computer and choose correct board type in Arduino IDE (WEMOS D1 MINI ESP32 for ESP32 Mini, ESP32S3 Dev Module for ESP32-S3 Super Mini) and the port.
- Set Tools ⇒ Core Debug Level to Error to see the errors in the serial console.
- Build and upload the firmware using Arduino IDE.
-
On Linux, install it like this:
curl -fsSL https://raw.githubusercontent.com/arduino/arduino-cli/master/install.sh | BINDIR=~/.local/bin sh
-
Windows users might need to install USB to UART bridge driver from Silicon Labs.
-
Compile the firmware using
make. Arduino dependencies will be installed automatically:make
You can flash the firmware to the board using command:
make upload
You can also compile the firmware, upload it and start serial port monitoring using command:
make upload monitor
For ESP32-S3/ESP32-C3 boards, set the appropriate FQBN using
BOARDparameter:make BOARD=esp32:esp32:esp32s3 upload
See other available Make commands in Makefile.
Tip
You can test the firmware on a bare ESP32 board without connecting IMU and other peripherals. The Wi-Fi network flix should appear and all the basic functionality including console and QGroundControl connection should work.
QGroundControl is a ground control station software that can be used to monitor and control the drone.
- Install mobile or desktop version of QGroundControl.
- Power up the drone.
- Connect your computer or smartphone to the appeared
flixWi-Fi network (password:flixwifi). - Launch QGroundControl app. It should connect and begin showing the drone's telemetry automatically.
Tip
If QGroundControl doesn't connect, try to disable the firewall and/or VPN on your computer, as they may block the connection.
The console is a command line interface (CLI) that allows to interact with the drone, change parameters, and perform various actions. There are two ways of accessing the console: using serial port or using QGroundControl (wirelessly).
To access the console using serial port:
- Connect the ESP32 board to the computer using USB cable.
- Open Serial Monitor in Arduino IDE (or use
make monitorin the command line). - In Arduino IDE, make sure the baudrate is set to 115200.
To access the console using QGroundControl:
- Connect to the drone using QGroundControl app.
- Go to the QGroundControl menu ⇒ Analyze Tools ⇒ MAVLink Console.

Tip
Use help command to see the list of available commands.
The drone is configured using parameters. To access and modify them, go to the QGroundControl menu ⇒ Vehicle Setup ⇒ Parameters:

You can also work with parameters using p command in the console. Parameter names are case-insensitive.
- Configure the following parameters for the IMU:
IMU_MODEL— IMU model (1 for MPU-9250/MPU-6500, 2 for ICM-20948, 3 for MPU-6050, 4 for ICM-40609-D).IMU_BUS— communication bus (0 for SPI, 1 for I²C).IMU_PIN_SCK,IMU_PIN_MISO,IMU_PIN_MOSI,IMU_PIN_CS— SPI pin numbers.IMU_PIN_SCL,IMU_PIN_SDA— I²C pin numbers.IMU_PIN_INT— IMU data ready pin number (-1 if not used).
- Reboot the drone.
- Check the IMU is working using
imucommand in the console (should printstatus: OK).
The IMU orientation (relative to the drone's axes) is defined using the parameters: IMU_ROT_ROLL, IMU_ROT_PITCH, and IMU_ROT_YAW.
The drone has X axis pointing forward, Y axis pointing left, and Z axis pointing up, and the supported IMU boards have X axis pointing to the mounting holes side and Z axis pointing up from the component side:

Use the following table to set the parameters for common IMU orientations:
| Orientation | Parameters | Orientation | Parameters |
|---|---|---|---|
 |
IMU_ROT_ROLL = 0IMU_ROT_PITCH = 0IMU_ROT_YAW = 0 |
 |
IMU_ROT_ROLL = 3.142IMU_ROT_PITCH = 0IMU_ROT_YAW = 0 |
 |
IMU_ROT_ROLL = 0IMU_ROT_PITCH = 0IMU_ROT_YAW = -1.571 |
 |
IMU_ROT_ROLL = 3.142IMU_ROT_PITCH = 0IMU_ROT_YAW = -1.571 |
 |
IMU_ROT_ROLL = 0IMU_ROT_PITCH = 0IMU_ROT_YAW = 3.142 |
 |
IMU_ROT_ROLL = 3.142IMU_ROT_PITCH = 0IMU_ROT_YAW = 3.142 |
 ☑️ Default |
IMU_ROT_ROLL = 0IMU_ROT_PITCH = 0IMU_ROT_YAW = 1.571 |
 |
IMU_ROT_ROLL = 3.142IMU_ROT_PITCH = 0IMU_ROT_YAW = 1.571 |
Before flight you need to calibrate the accelerometer:
- Access the console using QGroundControl (recommended) or Serial Monitor.
- Type
cacommand there and follow the instructions.
If using non-default motor pins, set the pin numbers using the parameters: MOTOR_PIN_FL, MOTOR_PIN_FR, MOTOR_PIN_RL, MOTOR_PIN_RR (front-left, front-right, rear-left, rear-right respectively).
If using brushless motors with ESCs:
- Set the appropriate PWM using the parameters:
MOT_PWM_STOP,MOT_PWM_MIN, andMOT_PWM_MAX(1000, 1000, and 2000 is typical). - Decrease the PWM frequency using the
MOT_PWM_FREQparameter (400 is typical).
Caution
Remove the props when configuring the motors! If improperly configured, you may not be able to stop them.
ESP32 ADC can measure only up to 3.3 V, so you need to use a voltage divider to monitor the battery voltage. To enable voltage measurement, set the following parameters:
PWR_VOLT_PIN— GPIO pin number where the voltage divider is connected (-1 to disable).PWR_VOLT_SCALE— voltage divider coefficient (2 for two equal resistors).
After this setup, you should see the battery voltage in QGroundControl top panel or using pw command in the console.
-
Check the IMU is working: perform
imucommand in the console and check the output:- The
statusfield should beOK. - The
ratefield should be about 1000 (Hz). - The
accelandgyrofields should change as you move the drone. - The
accel biasandaccel scalefields should contain calibration parameters (not zeros and ones). - The
gyro biasfield should contain estimated gyro bias (not zeros). - The
landedfield should be1when the drone is still on the ground and0when you lift it up.
- The
-
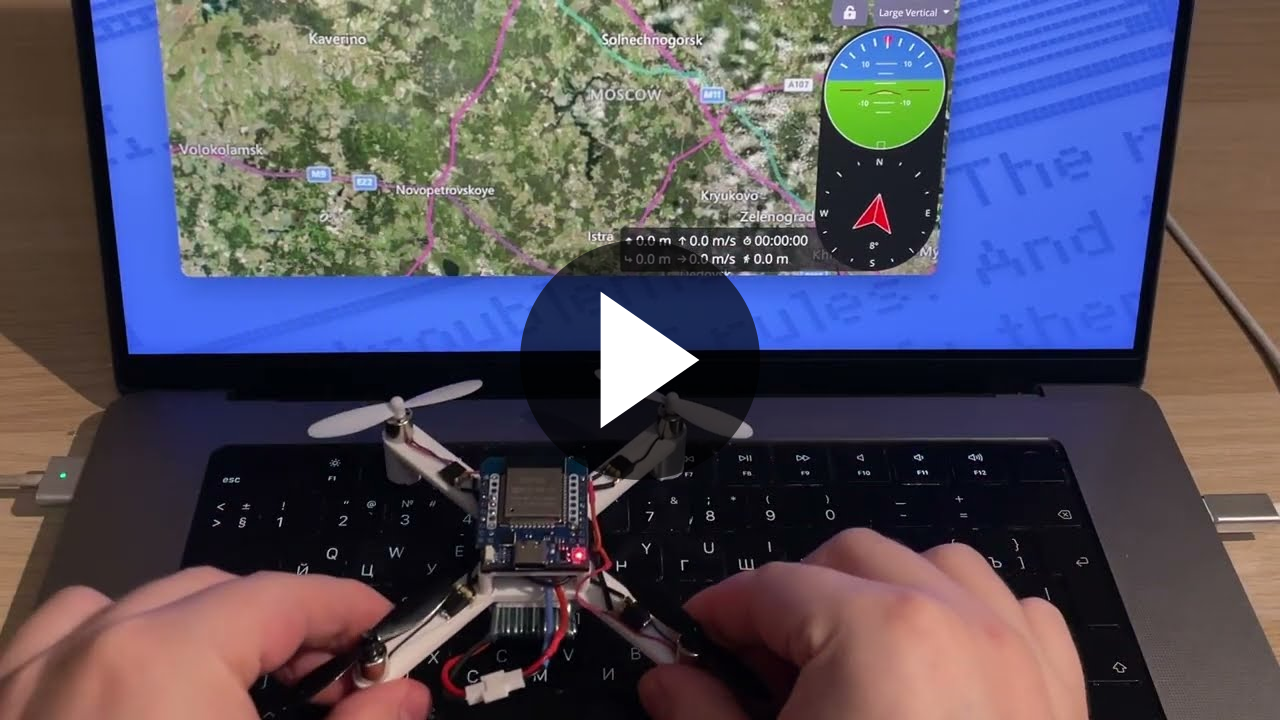
Check the attitude estimation: connect to the drone using QGroundControl, rotate the drone in different orientations and check if the attitude estimation shown in QGroundControl is correct. Compare your attitude indicator (in the large vertical mode) to the video:
-
Perform motor tests. Use the following commands — remove the propellers before running the tests!
mfr— rotate front right motor (counter-clockwise).mfl— rotate front left motor (clockwise).mrl— rotate rear left motor (counter-clockwise).mrr— rotate rear right motor (clockwise).
Make sure rotation directions and propeller types match the following diagram:


Warning
Never run the motors when powering the drone from USB, always use the battery for that.
There are several ways to control the drone's flight: using smartphone (Wi-Fi), using SBUS remote control, or using USB remote control (Wi-Fi/ESP-NOW).

- Download and install Mavlink Joystick app.
- Power the drone using the battery.
- Connect your smartphone to the appeared
flixWi-Fi network (password:flixwifi). - Open Mavlink Joystick app. It should connect and begin showing the drone's telemetry automatically.
- Use the virtual joystick to fly the drone!
- Install QGroundControl mobile app on your smartphone.
- Power the drone using the battery.
- Connect your smartphone to the appeared
flixWi-Fi network (password:flixwifi). - Open QGroundControl app. It should connect and begin showing the drone's telemetry automatically.
- Go to the settings and enable Virtual Joystick. Auto-Center Throttle setting should be disabled.
- Use the virtual joystick to fly the drone!
Tip
Decrease CTL_ATT_MAX parameter when flying using the smartphone to make the controls less sensitive.
If using SBUS-connected remote control you need to enable SBUS and calibrate it:
- Connect to the drone using QGroundControl.
- In parameters, set the
RC_RX_PINparameter to the GPIO pin number where the SBUS signal is connected, for example: 4. Negative value disables SBUS. - Check if the receiver is working using
rccommand in the console. - Open the console, type
crcommand and follow the instructions to calibrate the remote control. - Use the remote control to fly the drone!
If your drone doesn't have RC receiver installed, you can use USB remote control and QGroundControl app to fly it.
- Install QGroundControl app on your computer.
- Connect your USB remote control to the computer.
- Power up the drone.
- Connect your computer to the appeared
flixWi-Fi network (password:flixwifi). - Launch QGroundControl app. It should connect and begin showing the drone's telemetry automatically.
- Go to the QGroundControl menu ⇒ Vehicle Setup ⇒ Joystick. Calibrate your USB remote control there.
- Use the USB remote control to fly the drone!
For both virtual sticks and a physical joystick, the default control scheme is left stick for throttle and yaw and right stick for pitch and roll:

To start the motors, you should arm the drone. To do that, move the left stick to the bottom right corner:

After that, the motors will start spinning at low speed, indicating that the drone is armed and ready to fly.
When finished flying, disarm the drone, moving the left stick to the bottom left corner:

Note
If something goes wrong, go to the Troubleshooting article.
Flight mode is changed using mode switch on the remote control (if configured) or using the console commands. The main flight mode is STAB. In order to change modes using SBUS remote control, set the parameters: CTL_FLT_MODE_0, CTL_FLT_MODE_1, and CTL_FLT_MODE_2 to required mode numbers (0 for RAW, 1 for ACRO, 2 for STAB, 3 for AUTO).
In this mode, the drone stabilizes its attitude (orientation). The left stick controls throttle and yaw rate, the right stick controls pitch and roll angles.
Important
The drone doesn't stabilize its position, so slight drift is possible. The pilot should compensate it manually.
In this mode, the pilot controls the angular rates. This control method is difficult to fly and mostly used in FPV racing.
RAW mode disables all the stabilization, and the pilot inputs are mixed directly to the motors. The IMU sensor is not involved. This mode is intended for testing and demonstration purposes only, and basically the drone cannot fly in this mode.
In this mode, the pilot inputs are ignored (except the mode switch). The drone can be controlled using pyflix Python library, or by modifying the firmware to implement the needed behavior.
If the pilot moves the control sticks and mode switch is not configured, the drone will switch back to STAB mode.
You can configure the Wi-Fi using parameters and console commands.
The Wi-Fi mode is chosen using WIFI_MODE parameter in QGroundControl or in the console:
0— Wi-Fi is disabled.1— Access Point mode (AP) — the drone creates a Wi-Fi network.2— Client mode (STA) — the drone connects to an existing Wi-Fi network (may cause additional delays, so generally not recommended).3— ESP-NOW mode — the drone uses ESP-NOW protocol for communication.
The SSID and password are configured using the ap and sta console commands:
ap <ssid> <password>
sta <ssid> <password>
Example of configuring the Access Point mode:
ap my-flix-ssid mypassword123
p WIFI_MODE 1
Disabling Wi-Fi:
p WIFI_MODE 0
ESP-NOW is a low level wireless communication protocol. It can provide lower latency, better reliability, and longer range than Wi-Fi. However, it requires a second ESP32 board to be used as a proxy for the computer.

To setup ESP-NOW communication:
-
Flash the second ESP32 board with ESP-NOW proxy sketch:
tools/espnow-proxy/espnow-proxy.ino. Use Arduino IDE or command line:make upload_proxy. -
Open Serial Monitor in Arduino IDE or use
make monitorcommand. The ESP32 will print its MAC address and generated encryption key, for example:espnow 7a:c8:e3:eb:bf:e9 &PiuSysxP9+$L&5ERun this line as a console command on each drone you want to bind to this proxy board. The maximum number of simultaneously connected drones is 20 (unencrypted) or 6 (encrypted).
-
Set the
WIFI_MODEparameter to3on the drone:p WIFI_MODE 3 -
Go to the QGroundControl menu ⇒ Application Settings ⇒ Comm Links, add new link with the following settings:
- Name: ESP32.
- Type: Serial.
- Serial Port: choose the port of the proxy ESP32 board, e. g.
/dev/cu.usbserial-0001. - Baud Rate: 115200.
-
Click Save, click Connect. QGroundControl should connect to the drone using ESP-NOW and begin showing the telemetry.
Tip
Make sure Arduino IDE is not running when using ESP-NOW proxy board, as it may block the serial port.
After the flight, you can download the flight log wirelessly for analysis. Use the following command on your computer for that:
make logSee more details about log analysis in the log analysis article.