How to host your modmail bot on Google Cloud Platform for free | Made by @mesub7
Want to host your modmail bot for free? Don’t want to be ridiculed for using Heroku, Glitch or repl.it? This guide will take you through how to get the bot running on Google Cloud. DISCLAIMER: I am not responsible for any charges that you face due to you digressing from the guide.
(Need to update your installation? Check this.)
Highly recommended: Configure from the host to save time and to minimise errors If you know your way a little bit around Linux and want to just download and configure the bot remotely, you can use the Terminal instructions found here. It's quicker but can be confusing if you're new to server administration as there is no graphical interface (buttons to press).
Due to the multiple services/applications that we are using, this guide may be outdated. If this is the case then please let me know here or in the discord server. I am aware that there are a few alternative methods to this. If you know what you are doing, then by all means use part of this guide and your own method. Just note that if you do this, I can’t really provide support as your method may be the reason it is not working.
This guide presumes that you have basic terminal/command prompt knowledge and you are running Windows 10. If you don’t know your dir from your cd then it might be worth getting somebody else (not me) set up this for you! Google has all the information that you need. I cannot be sure if the steps are different in other operating systems, use your own judgement for equivalents.
So, with that out of the way, let us begin!
- Navigate to https://discord.com/developers/applications and click new application.
- Give it a name.
- Go to the bot section (which is found on the left hand navigation pane) and click add bot.
- Confirm your choice.
- Ensure that the Server Members intent is enabled.
- (Optional) Customise your bot. You can change the name and add a profile picture if you wish. You can also make the bot private (so only you can invite it). Do not change the OAUTH2 code grant setting.

Don’t forget to save!
We’ll be coming back to this later so make sure that you keep this tab open!
- Navigate to https://github.com/Dragory/modmailbot/releases and download the latest version (as of me updating this it was v3.0.3).
- Download the zip and extract it to a folder.
- Copy and paste the
example.config.inifile and rename it toconfig.ini.
- Open the config.ini file and edit it to your liking. You’ll need the bot token from the developer portal as well as a
mainServerIdand ainboxServerId. For information on what can go in the config file, check the official documentation.

- Save the config file.
- Make sure you know where you’ve kept this folder, you will need it later on.
This is where we’ll be hosting the bot:
- Navigate to https://cloud.google.com/free and select “Get started”.
- Enter your card details. But I thought it was free? It is free, but for verification purposes, Google needs it. You will not be charged unless you upgrade to a billing account.
But I [insert excuse here] and don’t have a card! I figured as such. Below, there is a flowchart that goes through what processes I think is feasible. NB: To save me time, credit/debit card == bank account (If you’ve got a bank account then it should accept it). Additionally, if you live in the US then Google also accepts PayPal. Consult: https://cloud.google.com/billing/docs/how-to/payment-methods for more information.

- Go to compute engine.
- Click create (when the option becomes available).
- Follow this very carefully if you want it to be free:

a. Give it a name. Select one of the following zones: us-central1 (lowa), us-east1 (south carolina) or us-west1 (oregon). I’m picking us-east1 as it is closest to Discord's API servers. I would leave the zone but change it if you wish.
b. Machine configuration should be: General Purpose Series: N1.
Machine type: f1-micro (1vCPU, 614MB of memory).
Bootdisk: Debian, CentOS or Ubuntu.
Leave the disk type to: standard persistent disk.
Disk size: 10-30GB (I’m using 25GB).
Leave the Identity section.
Firewall: Allow both HTTPS and HTTP traffic.
If you did it all correctly then it should tell you that your first 744 hours (or something along those lines) are free (This would be on the side of the screen).

-
Click create! Once it has loaded it’ll look something like this:
-
Click the SSH button to view your instance. It should be a command line.
-
Run
whoamiand note the output. It is very important (to avoid user account issues).


We need the node version manager and node.js for the bot and we need pm2 to keep it on all the time, so we’ll take the opportunity to get them now.
-
Navigate to https://github.com/nvm-sh/nvm#installing-and-updating
-
Copy the first
curl -o-…command (from the page). This will run the install script (doing all the dirty work for us). :P -
Close and reopen your terminal (the window).
-
Run
nvmto verify that it has been installed.
Now to install node.
- List the versions of node available by running
nvm ls-remote.
Now (at the time of writing) since the bot supports versions 12 to 14, for compatibility's sake, we'll install the latest version of V12 (feel free to install any version between 12 and 14).
-
Run
nvm install 12.19.0(or whatever version you want that's between V12 and V14 (like 14.13.1 for example). -
Optional: run
nvm lsto verify that it is installed.
Now for pm2.
-
Run
npm install -g pm2. -
Close the terminal.
We would have gone with FTP (File Transfer Protocol) but I was advised to use SFTP (Secure File Transfer Protocol) so here we are (oh and using SFTP saves us a few steps).

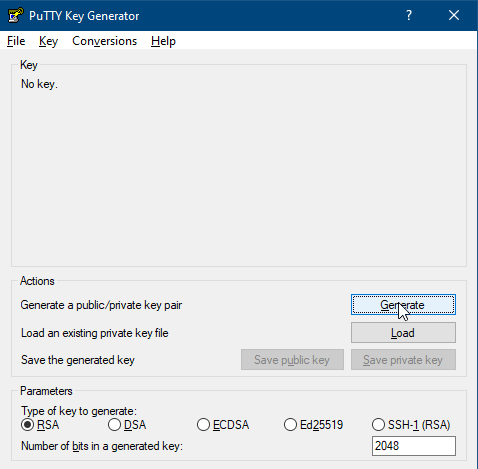
- Once the window has opened, click on generate (no need to change any settings) and move your mouse around to generate some randomness.
-
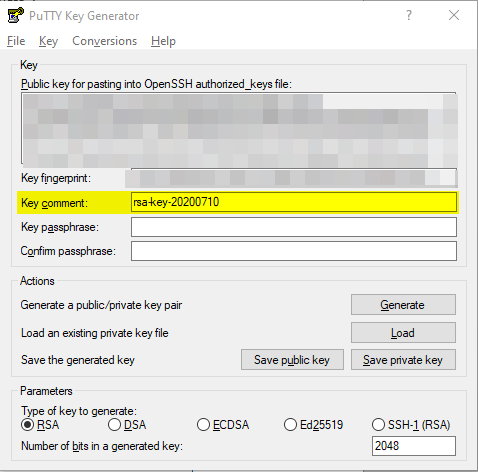
Change the key comment to the output of the whoami command you ran earlier!!!.
-
Save the private key. Keep it safe as you’ll need it later!
-
Copy the public key.
a. I would also recommend that you save the public key as well, anything could happen!
-
Click on the name of your compute engine.
-
Click edit at the top.

- Scroll down to the SSH section and click “Show and edit”.

-
Paste the public key that you copied from PuTTY earlier.
-
Scroll down to the bottom and click save.

Now we need to upload the bot’s files!
-
Download and install the FileZilla Client here.
-
Run the application.
-
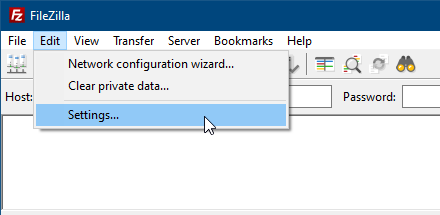
Go to the settings menu.
-
Go to the SFTP section.
-
Click “Add key file” and add the private key file that you generated earlier.
-
Press ok.

-
Navigate to File > Site Manager.
-
Click new site.
-
Give it a name.
-
Copy the external IP address from Google Cloud and place it in the host section.
-
In the username section, put in the output of the
whoamicommand (which you should have got from the terminal). -
Click ok to save it. (Password Prompt is optional)


Now we’ve set it all up, we should be able to access the server!
- Navigate to File > site manager.
-
Click connect.
-
If given a password prompt, just leave it blank and press enter.
-
If given an unknown key prompt comes up, then click ok (Always trusting the host is up to you).

If it all works, then it should look like this:

- Locate your bot’s files in the internal navigator.

-
Drag the files over.
-
If it was successful then you should see the folder on the other side.

Now it is time to get the bot in your servers!
-
Go back to the discord developer page that you should have left open.
-
Go to the hamburger menu and click on oauth2.

-
Scroll down and select bot.
-
Add the following permissions: manage channels, manage messages and attach files.
-
Navigate to the link generated.
-
Add the bot to your sever(s).

Now that we’ve set everything up, we should be able to start the bot!
-
Navigate to the bot’s directory (you should know your way around navigation commands in linux).
-
Run
npm ci. -
Run
npm start. If it all works then it should say "Done! Now listening to DMs" once it has loaded the config. -
Escape npm by pressing
control+c. -
Run
pm2 start modmailbot-pm2.json- This will ensure that the bot stays online when we close the terminal. Congratulations! You’ve now got a modmail bot that is being run for free and you’ve gained a little Linux knowledge 😊.
Skip this section if you have followed the guide all the way up to here. Here's a jumplink.
This allows you to download and configure the bot from the terminal, no fuss involved. I will not be providing support on this section. (Many thanks to @dopeghoti for providing this method.)
Prerequisite: Please follow steps 1 and 3 before continuing this section.
-
Make a directory and navigate to it.
-
Install wget (
sudo apt install wget) -
Run
wget https://github.com/Dragory/modmailbot/archive/v3.0.3.tar.gz -
Run
tar zxf v3.0.3.tar.gz -
Navigate to the directory it creates.
-
Run
cp config.{example.,}ini -
Run
nano config.iniand edit the config to your liking.
Continue following the guide from step 9.
We've got the bot working now but you may want to have working logs. If this is the case then follow the instructions below.
Prequisite: Port 8890 (TCP) has to be opened. If you don't know how to open a port then check PortForward's website.
Once you've done that then:
-
Click on compute engine and then VM instances.
-
If you didn't dismiss the related actions section, there should be an option to go to the "firewall rules" section. Click it.

a) If there isn't anything about that then navigate to: https://console.cloud.google.com/networking/firewalls/.
You should be here:

-
Click on "Create firewall rule".
-
It should have the following details: Name: anything you want.
Leave priority.
Direction: Ingress. We are connecting to the server.
Action on match: Allow.
Targets: All instances in the network. You can use the other ones if you know what you're doing.
Source Filter: IP ranges.
Source IP ranges: 0.0.0.0/0.
Protocols and ports: Allow specific protocols and ports. tcp: 8890.
It should look a bit like this:

-
Click create.
-
Try it out! If you've set up everything correctly then it should work.
You've now got a fully functioning modmail bot! Thank me later.
It says "please run npm install before running the bot", what should I do?
Don't do it. Verify that npm, node and nvm are all installed correctly and make sure that the bot's files are in the right directory (refer to Step three, instruction eight). If you are very, very sure that this is all correct then refer to the username issue here.
Can I get the log links to use my website?
Yes but I don't have a domain and this is out of scope for this guide. I can only say that you need to have a webserver and you also need to set up a reverse proxy.
Can I have more than one installation running at the same time
Yes. Just ensure that you set a different port and the second installation is in a different folder. You can also use environment variables.
How long is this free for?
Until Google decides to change its always free tier to something that isn't usable (unlikely).
I get an error about gateway intents or the bot is stuck on "Connecting to Discord..."
Make sure that the server members intent is enabled.
This only applies if you are configuring the bot from your system and not doing it all from the terminal
It is quite important that the username/key comment matches what the whoami command outputs, If this doesn't happen then you will either be unable to connect to the server OR your files will be on another user account (which you specified).
In order to avoid this, please please please try to make sure that the username/key-comment matches the output of the whoami command. At the very minimum though (or if you aren't using PuTTY), make sure that the key comment and the username for FileZilla match. We can change the Linux username (on Google's end) by doing the following:
IMPORTANT: Files on your old username will be wiped, be sure that you don't need anything from it. You have been warned.
-
Connect to your instance.
-
Click on the gear.

- Click Change Linux username.

-
Enter the username that the key comment/FileZilla username used.
-
Click change.
You will be connected to the instance under the new username. The files that you transferred over should be there.
Note: It is very very likely that you will need to install all of the necessary software again (it seems to install on a per user basis).
Of course you can easily avoid this by configuring from the terminal.
If you are having issues with anything in this guide and you've tried to help yourself, then I am in Dragory's discord server (mesub#0556). I may not be online when you post your question though.
Additionally, if you've got any suggestions on how to improve the guide then please feel free to create an issue or find me in Dragory's discord server.
This guide was last updated on the 8/11/2020. Guide revision: 5 (V1.4.1)